


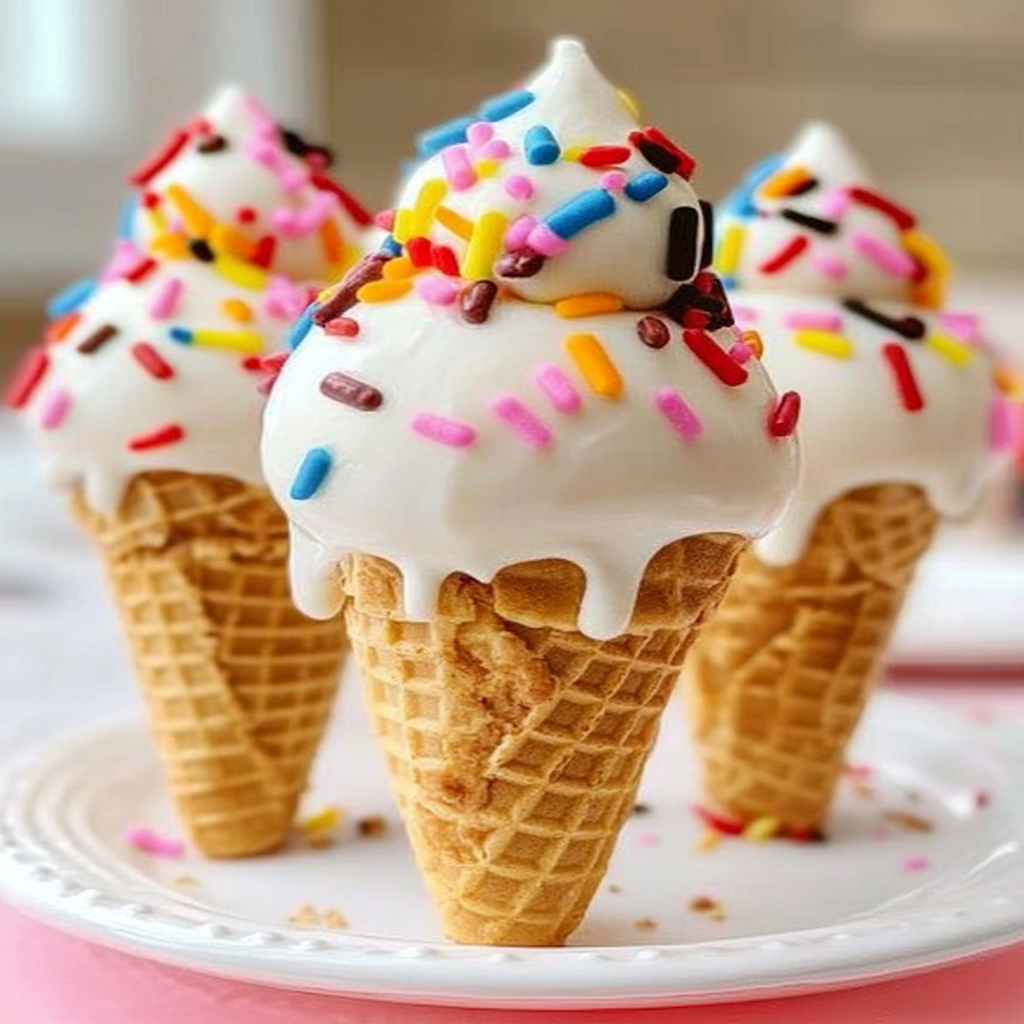
Ice Cream Cone Cake Pops are a delightful fusion of childhood nostalgia and adult creativity, enticing you with their whimsical charm. Imagine sinking your teeth into a crunchy cone filled with fluffy cake and smooth frosting, all while the sun shines down, draping everything in warmth and sweetness. grilled peach salad This treat is not just a dessert; it’s a celebration waiting to happen.
Picture this: It’s a sunny afternoon, and you’re hosting a backyard party. The kids are running wild, the adults are lounging with drinks, and suddenly someone pulls out these magical Ice Cream Cone Cake Pops. Laughter erupts as everyone dives into these treats that look like ice cream but taste like cake. Memories are made, smiles abound, and the flavors? Absolutely heavenly! You’ll want to make these for every occasion imaginable. For more inspiration, check out this snickerdoodle truffles recipe.
Why You'll Love This Recipe
- These Ice Cream Cone Cake Pops offer fantastic flavor combined with an easy preparation process.
- They look stunning on any dessert table, making them perfect for parties or gatherings.
- You can customize them with various frostings and toppings based on your preferences or what you have at home.
- They’re not just desserts; they’re delightful experiences that bring joy!
Ingredients for Ice Cream Cone Cake Pops
Here’s what you’ll need to make this delicious dish:
- Ice Cream Cones: Choose regular cones for ease or waffle cones for added crunch; both work perfectly.
- Cake Mix: Any flavor you love works here; chocolate or vanilla is always a crowd-pleaser.
- Eggs: Use large eggs for the best texture in your cake pops.
- Vegetable Oil: This adds moisture to your cake mix; don’t skip it.
- Frosting: Store-bought or homemade; pick your favorite flavor to complement the cake.
- Chocolate Melts: Select colored melts for decoration or classic chocolate for coating.
- Sprinkles: Go wild with colors; sprinkles add that wow factor!
The full ingredients list, including measurements, is provided in the recipe card directly below.
How to Make Ice Cream Cone Cake Pops
Follow these simple steps to prepare this delicious dish:
Step 1: Prepare Your Cake
Preheat your oven to 350°F (175°C). In a mixing bowl, combine the cake mix, eggs, and vegetable oil according to package instructions. Pour the batter into a greased baking pan and bake for about 25 minutes or until a toothpick comes out clean.
Step 2: Let It Cool
Once baked, remove the cake from the oven and allow it to cool completely on a wire rack. Patience is key here; we don’t want melted frosting!
Step 3: Crumble the Cake
Crumble the cooled cake into a large bowl. Use your hands (clean ones!) to break it into fine crumbs. This helps create that perfect pop texture.
Step 4: Mix in Frosting
Add about half a cup of frosting into the crumbled cake mixture. Mix well until combined; it should be moist enough to hold its shape when formed into balls.
Step 5: Shape Into Balls
Scoop out portions of the mixture and roll them into balls about one inch in diameter. Place each ball onto a baking sheet lined with parchment paper.
Step 6: Dip & Decorate
Melt your chocolate melts according to package instructions. Dip the tops of each ice cream cone into the melted chocolate before inserting a cake ball on top. Decorate with sprinkles while still wet!
Transfer them back onto the parchment lined tray and let them set until hardened. Serve these fun pops at your next gathering or simply enjoy them as an afternoon snack!
Now sit back, relax, and watch as these Ice Cream Cone Cake Pops steal the show at any event!
You Must Know
- These delightful Ice Cream Cone Cake Pops are not just a treat; they bring joy to any gathering.
- They’re easy to make, customizable, and are sure to impress both kids and adults alike.
- With their colorful appearance and delicious flavors, these pops are a party in your mouth!
Perfecting the Cooking Process
To craft perfect Ice Cream Cone Cake Pops, start by baking your cake. Let it cool while you prepare the frosting. Crumble the cake and mix with frosting for a dough-like consistency. Then fill the cones and freeze before coating them in chocolate. For more inspiration, check out this peppermint dark chocolate truffles recipe.
Add Your Touch
Feel free to customize your Ice Cream Cone Cake Pops! Swap out vanilla cake for chocolate or add rainbow sprinkles into the frosting. You can also use white chocolate for coating or experiment with different toppings like nuts or crushed candies.
Storing & Reheating
Store your Ice Cream Cone Cake Pops in an airtight container in the fridge for up to a week. If you’re feeling adventurous, pop them in the freezer for longer storage. Just remember to let them thaw slightly before enjoying!
Chef's Helpful Tips
- For perfectly round cake pops, pack the mixture tightly into the cones before freezing.
- Use quality chocolate for coating to enhance flavor and texture.
- If using sprinkles, add them immediately after coating while the chocolate is still wet.
I once made these Ice Cream Cone Cake Pops for my nephew’s birthday party, and they were gone faster than I could say “sugar rush!” Seeing everyone’s delighted faces was priceless—it turned into an impromptu ice cream cone competition!
FAQs:
What are Ice Cream Cone Cake Pops?
Ice Cream Cone Cake Pops are a delightful dessert that combines the playful appearance of ice cream cones with the rich flavors of cake pops. These treats feature cake molded into a ball shape, placed on top of mini ice cream cones, and coated with chocolate or candy melts. They are perfect for parties, celebrations, or just a fun family treat. The versatility in flavors allows you to create anything from classic vanilla to decadent chocolate, making them a favorite among both kids and adults.
How do I make Ice Cream Cone Cake Pops at home?
To create Ice Cream Cone Cake Pops at home, start by baking your favorite cake flavor. Once cooled, crumble the cake and mix it with frosting until it reaches a moldable consistency. Shape the mixture into balls and insert them into mini ice cream cones. Dip each cone in melted chocolate or candy melts and decorate as desired. Allow them to set in the refrigerator before serving for a fun and tasty treat that everyone will love!
Can I customize the flavors of Ice Cream Cone Cake Pops?
Absolutely! One of the best aspects of Ice Cream Cone Cake Pops is their versatility in flavors. You can use any type of cake mix or even make a homemade recipe to fit your taste preferences. Additionally, you can experiment with various frostings and coatings. no bake cheesecake recipe Consider adding sprinkles, nuts, or crushed cookies on top for extra texture and flavor. Feel free to get creative with colors and decorations to match any occasion.
How should I store Ice Cream Cone Cake Pops?
To ensure your Ice Cream Cone Cake Pops stay fresh, store them in an airtight container at room temperature for up to three days. If you need to keep them longer, consider refrigerating them; however, avoid stacking them directly on top of one another to prevent damage to the coating. delicious summer popsicles You can also freeze these delightful treats for up to a month—just remember to let them thaw at room temperature before serving so they retain their delicious texture.
Conclusion for Ice Cream Cone Cake Pops:
In summary, Ice Cream Cone Cake Pops are an exciting dessert option that combines fun presentation with delicious flavors. They are easy to make at home using your favorite cake recipes and can be customized for any event or occasion. berry trifle cups for dessert With simple ingredients and a little creativity in decoration, these treats are sure to impress both kids and adults alike. Enjoy this delightful dessert that’s perfect for parties or a sweet treat anytime!

Ice Cream Cone Cake Pops
- Total Time: 45 minutes
- Yield: Approximately 12 servings 1x
Description
Ice Cream Cone Cake Pops are a delightful twist on traditional cake pops, combining the nostalgic shape of ice cream cones with moist cake and rich frosting. Perfect for any celebration, these treats are fun to make and easy to customize. With a crunchy cone base topped with fluffy cake balls, coated in chocolate, and adorned with colorful sprinkles, they add a whimsical touch to your dessert table. Whether you’re hosting a party or looking for a sweet afternoon snack, these cake pops will bring joy to both kids and adults alike.
Ingredients
- 1 box (15.25 oz) cake mix (any flavor)
- 3 large eggs
- 1/2 cup vegetable oil
- 1 cup frosting (store-bought or homemade)
- 12 mini ice cream cones
- 1 cup chocolate melts (colored or classic)
- 1/2 cup sprinkles
Instructions
- Preheat your oven to 350°F (175°C). Prepare the cake mix, eggs, and vegetable oil according to package instructions. Bake in a greased pan for about 25 minutes or until a toothpick comes out clean.
- Allow the cake to cool completely on a wire rack.
- Crumble the cooled cake into fine crumbs in a large bowl. Mix in the frosting until it reaches a dough-like consistency.
- Roll the mixture into 12 balls, about one inch in diameter, and place them on a parchment-lined baking sheet.
- Melt chocolate melts according to package instructions. Dip each mini cone’s top into the melted chocolate and place a cake ball on top.
- Decorate with sprinkles immediately while the chocolate is still wet. Let set until hardened.
- Prep Time: 20 minutes
- Cook Time: 25 minutes
- Category: Dessert
- Method: Baking
- Cuisine: American
Nutrition
- Serving Size: 1 serving
- Calories: 170
- Sugar: 14g
- Sodium: 85mg
- Fat: 7g
- Saturated Fat: 3g
- Unsaturated Fat: 4g
- Trans Fat: 0g
- Carbohydrates: 24g
- Fiber: 0g
- Protein: 2g
- Cholesterol: 30mg

Leave a Comment