


Cheesecake pops are like tiny bites of happiness on a stick, inviting you to indulge in their creamy goodness. Imagine biting into a rich cheesecake, coated in chocolate, and resting atop a perfectly crisp pop stick – pure bliss! These delightful treats are perfect for any occasion, whether you’re hosting a summer barbecue or just need a sweet escape from the daily grind. delicious summer popsicles
I remember the first time I made cheesecake pops; my kitchen looked like a dessert explosion had occurred. The cream cheese was everywhere, and I may or may not have ended up with chocolate on my nose. But oh, the joy of sharing those little gems with friends made it all worthwhile! Trust me, you’ll want to make these for birthdays, picnics, or just a cozy evening binge-watching your favorite series. For more inspiration, check out this Magic Pecan Cheesecake Bars recipe.
Why You'll Love This Recipe
- Cheesecake pops are incredibly easy to prepare and don’t require baking, making them a perfect last-minute dessert.
- Each bite bursts with a creamy flavor profile that balances sweetness and richness.
- Their visual appeal is undeniable, as they can be dressed up in various toppings for any occasion.
- Plus, these versatile treats can be customized with different flavors or coatings to fit your mood!
Ingredients for Cheesecake Pops
Here’s what you’ll need to make this delicious dish:
- Cream Cheese: Use full-fat cream cheese for the richest taste and best texture.
- Powdered Sugar: This sweetener blends easily into the cream cheese for smooth pops.
- Vanilla Extract: A splash will enhance the flavor; choose pure vanilla for the best results.
- Chocolate Chips: Use semi-sweet or dark chocolate chips for coating; they add that delectable crunch.
- Popsicle Sticks: These sturdy sticks hold your cheesecake pops together beautifully.
For Toppings:
- Sprinkles: Add colorful sprinkles for an extra fun touch that kids will love.
- Nuts: Chopped nuts provide an excellent crunchy texture contrast to the creamy cheesecake.
The full ingredients list, including measurements, is provided in the recipe card directly below.
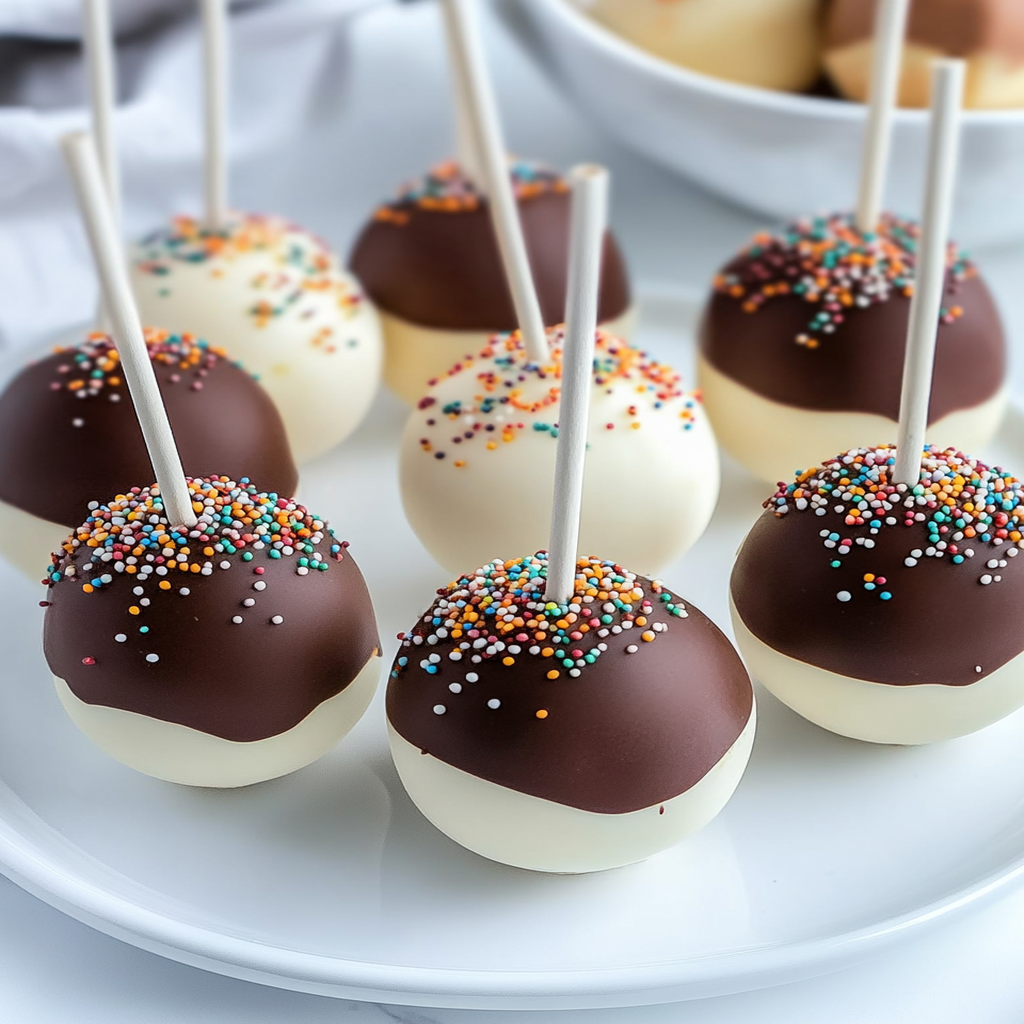
How to Make Cheesecake Pops
Follow these simple steps to prepare this delicious dish:
Step 1: Prepare Your Base
In a mixing bowl, combine softened cream cheese with powdered sugar and vanilla extract. Use an electric mixer on medium speed until smooth and creamy; no lumps allowed!
Step 2: Shape Your Pops
Scoop out tablespoon-sized portions of the cheesecake mixture and roll them into balls using your hands. Place them on a baking sheet lined with parchment paper.
Step 3: Freeze It Up
Insert popsicle sticks into each ball carefully and freeze them for at least two hours until firm. This step is crucial – nobody likes pancake pops!
Step 4: Melt the Chocolate
While waiting for your pops to freeze, melt chocolate chips in a microwave-safe bowl in short bursts of 30 seconds; stir between each burst until smooth.
Step 5: Coat Your Pops
Once frozen solid, dip each cheesecake ball into the melted chocolate, allowing excess chocolate to drip off before placing them back on the parchment paper.
Step 6: Add Toppings
Before the chocolate sets completely, sprinkle your favorite toppings on each pop. Get creative – this is where personalization happens!
Transfer to plates and enjoy these delightful treats chilled – they’re perfect after dinner or as an afternoon pick-me-up!
You Must Know
- Cheesecake pops are the ultimate treat for any occasion, offering a delightful blend of creamy goodness and fun presentation.
- These little bites are perfect for parties or snacking and can be customized to match your mood.
- Plus, who doesn’t want to eat cheesecake on a stick?
Perfecting the Cooking Process
Start by preparing your cheesecake filling and chilling it until firm. Once ready, scoop the mixture into pop molds or make small balls to freeze. Dip each pop in chocolate and let it set for the best results.
Add Your Touch
Feel free to jazz up your cheesecake pops with flavorings like vanilla extract, lemon zest, or even Nutella for a twist. You can also roll them in crushed cookies or sprinkles for added texture and fun. For more inspiration, check out this Strawberry Cheesecake Cookies recipe.
Storing & Reheating
Store leftover cheesecake pops in an airtight container in the freezer to maintain their yummy consistency. Just take them out as needed—no reheating required because they’re best served cold!
Chef's Helpful Tips
- For a smoother cheesecake filling, ensure your cream cheese is at room temperature before mixing.
- Experiment with different toppings like fruit or caramel drizzle for variety.
- Always allow your pops ample time to chill and set before serving for that perfect bite.
I once made these cheesecake pops for a family gathering, and they vanished faster than my hopes of maintaining a diet! Everyone was raving about how delicious they were, and I ended up giving away my secret recipe—who knew sharing could be so sweet? adding a crunchy element.
FAQs :
What are Cheesecake Pops?
Cheesecake pops are delightful bite-sized treats that combine the creamy texture of cheesecake with the convenience of a lollipop. These sweets are typically made by combining cream cheese, sugar, and flavorings, then rolling them into balls, coating them in chocolate or candy melts, and placing them on sticks. layered dessert with berries This fun dessert is perfect for parties or gatherings and can easily be customized with various toppings or flavors.
How do I store Cheesecake Pops?
To keep your cheesecake pops fresh, store them in an airtight container in the refrigerator. They can last for about a week when properly stored. If you want to extend their shelf life, consider freezing them. Just make sure to wrap each pop individually in plastic wrap before placing them in a freezer-safe container. When you’re ready to enjoy them, let them thaw in the fridge for a few hours.
Can I customize my Cheesecake Pops?
Absolutely! Cheesecake pops are incredibly versatile. You can experiment with different flavors by adding extracts like vanilla, lemon, or chocolate. Additionally, feel free to mix in crushed cookies or fruit puree for added texture and taste. For toppings, think sprinkles, crushed nuts, or even drizzles of caramel sauce—let your creativity shine!
Are Cheesecake Pops suitable for special diets?
Cheesecake pops can be adapted for different dietary needs. For a gluten-free version, simply use gluten-free cookies as your base. If you’re looking to make a dairy-free option, try using vegan cream cheese and dairy-free chocolate for coating. Always check ingredient labels to ensure that they meet any specific dietary restrictions.
Conclusion for Cheesecake Pops :
In summary, cheesecake pops are a fun and creative dessert that brings joy to any occasion. With their customizable nature, you can tailor flavors and toppings to suit your taste preferences or dietary needs. Storing these treats correctly ensures they stay fresh and delicious for longer. Whether enjoyed at a celebration or as an everyday snack, cheesecake pops are sure to impress both kids and adults alike!
Cheesecake Pops
- Total Time: 0 hours
- Yield: Makes approximately 10 cheesecake pops 1x
Description
Cheesecake pops are a delightful twist on the classic dessert, combining the rich, creamy texture of cheesecake with the fun of a portable pop. Coated in luscious chocolate and customizable with a variety of toppings, these no-bake treats are perfect for any occasion—from birthday parties to cozy nights at home. Easy to make and irresistibly delicious, cheesecake pops are sure to impress both kids and adults alike!
Ingredients
- 8 oz cream cheese, softened
- 1 cup powdered sugar
- 1 tsp vanilla extract
- 1 cup semi-sweet chocolate chips
- 10 popsicle sticks
Instructions
- In a mixing bowl, beat cream cheese, powdered sugar, and vanilla until smooth.
- Scoop tablespoon-sized portions and roll into balls; place on a parchment-lined baking sheet.
- Insert popsicle sticks into each ball and freeze for at least 2 hours.
- Melt chocolate chips in short bursts in the microwave until smooth.
- Dip frozen cheesecake balls into melted chocolate, allowing excess to drip off before returning them to the parchment.
- Add desired toppings before the chocolate sets.
- Prep Time: 20 minutes
- Cook Time: None
- Category: Dessert
- Method: No-Bake
- Cuisine: American
Nutrition
- Serving Size: 1 serving
- Calories: 139
- Sugar: 11g
- Sodium: 40mg
- Fat: 8g
- Saturated Fat: 4g
- Unsaturated Fat: 4g
- Trans Fat: 0g
- Carbohydrates: 15g
- Fiber: 0g
- Protein: 2g
- Cholesterol: 30mg

Leave a Comment