


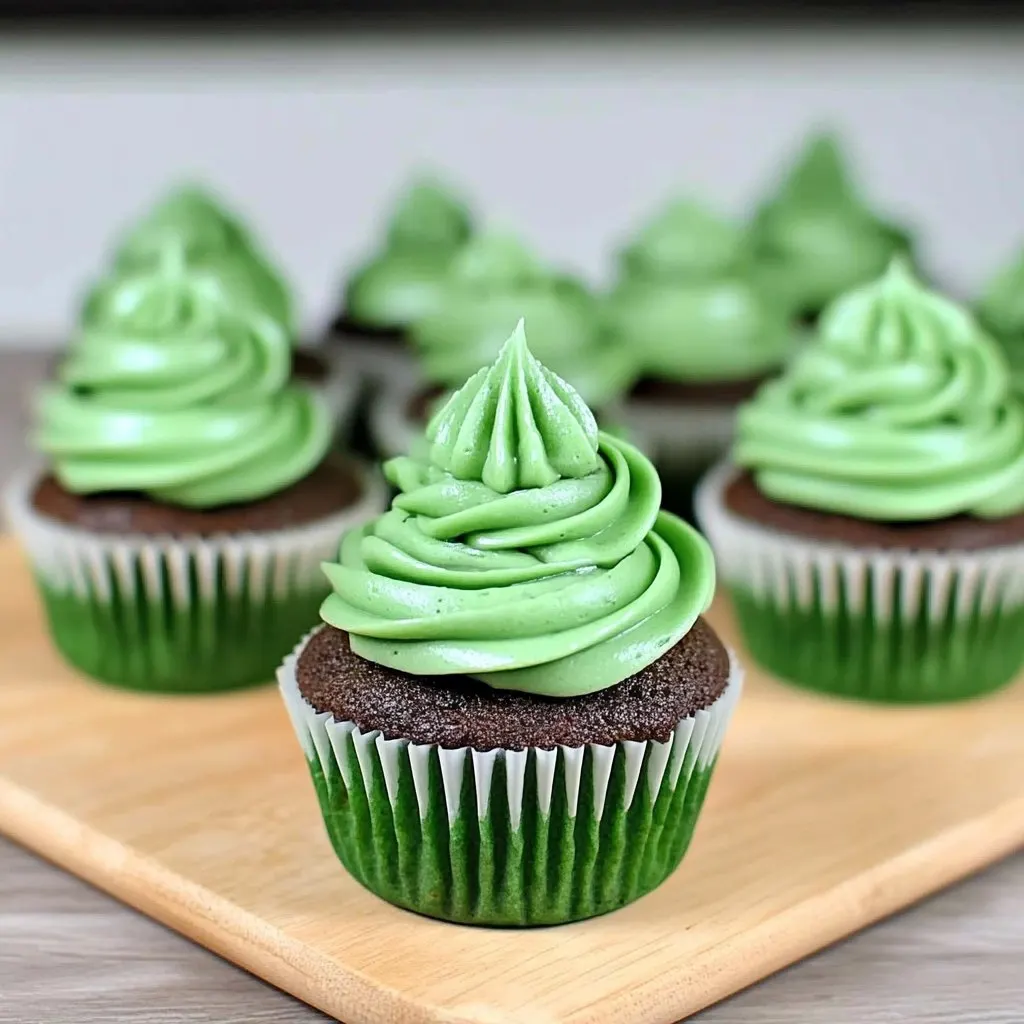
Imagine sinking your teeth into a moist and vibrant green velvet cupcake, where the rich cocoa flavor mingles with a hint of vanilla, creating an explosion of taste that dances on your palate. The moment you catch a whiff of the sweet cream cheese frosting wafting through the air, you’re transported to a whimsical world where every bite feels like a celebration, eagerly inviting you to indulge time and time again.
I still remember the first time I baked green velvet cupcakes for my best friend’s birthday; her delighted gasp as she took that first bite is a memory etched in my heart forever. These delightful treats are perfect for any occasion—whether it’s a festive gathering or just a cozy night in—and promise to leave everyone craving more, making your baking adventure both joyous and rewarding.
Why Is Green Velvet Cupcakes So Irresistibly Good?
Moist and fluffy, these cupcakes boast a delightful texture that melts in your mouth. Vibrant green color makes them a stunning centerpiece for any occasion, whether it’s a birthday or holiday celebration. Simple ingredients like buttermilk and unsalted butter elevate the flavor, while the cream cheese frosting adds a rich, tangy sweetness. Quick to prepare, you can whip up a batch in just 35 minutes! Crowd-pleasing, these cupcakes are sure to impress friends and family alike with their unique twist on a classic favorite.
Green Velvet Cupcakes Ingredients
For the Batter
- 1 cup all-purpose flour – This forms the base of your cupcakes, providing structure and texture.
- 1 cup granulated sugar – Sweetens your cupcakes while helping to create a moist crumb.
- 1/2 cup unsalted butter (softened) – Adds richness and moisture; ensure it’s softened for easy mixing.
- 2 large eggs – Helps bind the ingredients together, giving your cupcakes a fluffy texture.
- 1 cup buttermilk – Keeps the batter moist and adds a delightful tanginess.
- 1 teaspoon vanilla extract – Enhances flavor with a warm, aromatic note that complements the sweetness.
- 1 teaspoon baking soda – Acts as a leavening agent, ensuring your cupcakes rise beautifully.
- 1 teaspoon white vinegar – Reacts with baking soda to create lift and tenderness in the cupcakes.
- 1/2 teaspoon salt – Balances sweetness and enhances all flavors in the batter.
- 2 tablespoons green food coloring (gel or liquid) – Gives these cupcakes their signature vibrant hue; adjust as desired for color intensity.
For the Cream Cheese Frosting
- 8 ounces cream cheese (softened) – Provides a rich, tangy flavor that pairs perfectly with sweet cupcakes.
- 1/2 cup unsalted butter (softened) – Adds creaminess and helps achieve a smooth consistency for spreading or piping.
- 4 cups powdered sugar – Sweetens the frosting while giving it that perfect fluffy texture; sift if lumpy.
- 1 teaspoon vanilla extract – Complements the flavors in the frosting, making it even more delightful on top of your Green Velvet Cupcakes.
Directions: Green Velvet Cupcakes
1. Preheat your oven to 350°F (175°C) and prepare a muffin tin with cupcake liners. This ensures your cupcakes bake evenly and don’t stick!
2. Cream together 1/2 cup softened unsalted butter and 1 cup granulated sugar in a mixing bowl until light and fluffy. This step is crucial for a moist texture.
3. Add the 2 large eggs one at a time, mixing well after each addition. This helps to incorporate air, giving your cupcakes that delightful lift!
4. Mix in 1 cup buttermilk, 1 teaspoon vanilla extract, 1 teaspoon baking soda, 1 teaspoon white vinegar, and 1/2 teaspoon salt until fully combined. The buttermilk adds moisture and richness.
5. Gradually add 1 cup all-purpose flour into the wet mixture, stirring until just combined. Then, stir in 2 tablespoons green food coloring until you achieve your desired vibrant hue.
6. Divide the batter evenly among the cupcake liners, filling each about 2/3 full. This allows room for rising while baking—no overflowing cupcakes here!
7. Bake for 18-20 minutes or until a toothpick inserted into the center comes out clean. You’ll know they’re ready when they spring back lightly when touched!
8. Cool the cupcakes completely on a wire rack before frosting them with cream cheese frosting—this will ensure the frosting doesn’t melt away.
For the Frosting:
9. Beat together 8 ounces softened cream cheese and 1/2 cup softened unsalted butter in a mixing bowl until smooth and creamy. This forms the base of your luscious frosting.
10. Gradually add in 4 cups powdered sugar along with 1 teaspoon vanilla extract, mixing until well combined and fluffy. The sweetness balances perfectly with the tangy cream cheese!
11. Frost the cooled cupcakes generously with your cream cheese frosting using a spatula or piping bag for that extra flair.
Optional: Top with sprinkles or edible glitter for a festive touch!
Exact quantities are listed in the recipe card below.
Expert Tips
- Butter Temperature: Ensure your butter is softened, not melted, to achieve that light and fluffy texture in your Green Velvet Cupcakes.
- Egg Addition: Add eggs one at a time; this helps maintain the batter’s structure and ensures even mixing for a moist cupcake.
- Buttermilk Benefits: Use room temperature buttermilk; it enhances flavor and contributes to the cupcakes’ moistness.
- Color Control: Start with 2 tablespoons of green food coloring; you can always add more until you reach your desired hue without overdoing it.
- Don’t Overmix: Mix the batter just until combined after adding flour—overmixing can lead to dense cupcakes instead of light, airy Green Velvet Cupcakes.
- Cooling Time: Allow cupcakes to cool completely before frosting; warm cupcakes can cause the cream cheese frosting to melt and lose its shape.
How to Store and Freeze Green Velvet Cupcakes
Room Temperature: Enjoy your Green Velvet Cupcakes at room temperature for up to 2 days; just keep them in an airtight container to maintain their moisture.
Fridge: For longer freshness, store the cupcakes in the fridge for up to 5 days. Make sure they are covered to prevent drying out.
Freezer: Freeze unfrosted cupcakes for up to 3 months. Wrap each cupcake tightly in plastic wrap, then place them in a freezer-safe bag for extra protection.
Frosting Storage: Store leftover cream cheese frosting in the fridge for up to a week. Keep it in an airtight container, and be sure to re-whip before using!
Green Velvet Cupcakes Variations
Feel free to sprinkle your personal touch on these delightful treats to make them truly yours!
- Gluten-Free: Substitute all-purpose flour with a 1:1 gluten-free baking blend for a deliciously moist cupcake that everyone can enjoy. You’ll still get that vibrant color and flavor without compromise.
- Vegan: Use flax eggs (2 tablespoons ground flaxseed + 6 tablespoons water) instead of eggs, and replace buttermilk with almond or soy milk mixed with vinegar. The result is a plant-based version that’s just as scrumptious!
- Chocolate Twist: Add 1/4 cup unsweetened cocoa powder to the flour for a rich chocolate flavor alongside the green velvet. This addition creates an indulgent, double-decker experience that chocolate lovers will adore.
- Minty Fresh: Incorporate 1 teaspoon of mint extract into your batter for a refreshing twist. The mint will elevate the flavor profile, making your cupcakes perfect for springtime celebrations.
- Zesty Lemon: Add the zest of one lemon and swap out vanilla extract for lemon extract. This brightens up the flavor, giving your cupcakes a cheerful citrus flair that pairs beautifully with cream cheese frosting.
- Spicy Kick: Mix in 1/2 teaspoon of cayenne pepper or cinnamon for an unexpected warmth. This subtle heat contrasts wonderfully with the sweetness, creating an intriguing depth of flavor.
- Nutty Addition: Fold in 1/2 cup finely chopped walnuts or pecans into the batter for a delightful crunch. The nuts add texture while complementing the moistness of the cupcakes perfectly.
- Cheesecake Center: Place a dollop of cheesecake filling in the center before baking using a mix of cream cheese, sugar, and egg. You’ll be surprised by the delicious surprise inside each cupcake!
Make Ahead Options
If you’re looking to make your baking routine more efficient, these Green Velvet Cupcakes are perfect for meal prep. You can prepare the cupcake batter up to 24 hours in advance by combining 1 cup of all-purpose flour, 1 cup of granulated sugar, 1/2 cup of softened unsalted butter, 2 large eggs, and 1 cup of buttermilk along with the vanilla extract, baking soda, vinegar, salt, and green food coloring. Simply mix everything together and store the batter in an airtight container in the fridge. As for the cream cheese frosting, it can be made up to 3 days ahead; just beat together 8 ounces of softened cream cheese and 1/2 cup of softened butter with 4 cups of powdered sugar and vanilla extract until fluffy. When you’re ready to bake, preheat your oven to 350°F (175°C), fill your muffin tins with the prepared batter, and bake for 18-20 minutes. Allow them to cool completely before frosting with your prepped cream cheese mixture. This way, you can serve fresh and delightful Green Velvet Cupcakes without the last-minute hassle!
Green Velvet Cupcakes Recipe FAQs
What can I use instead of buttermilk?
If you don’t have buttermilk on hand, don’t worry! You can easily make a substitute by mixing 1 tablespoon of white vinegar or lemon juice with 1 cup of milk. Let it sit for about 5-10 minutes until it thickens slightly. This will give your cupcakes that same delightful moisture and tang!
How should I store leftover cupcakes?
To keep your green velvet cupcakes fresh, store them in an airtight container at room temperature for up to 2 days. If you want to keep them longer, place them in the refrigerator for up to a week. Just allow them to come to room temperature before serving for the best flavor!
Can I freeze these cupcakes?
Absolutely! These moist green velvet cupcakes freeze beautifully. Once completely cooled, wrap each cupcake tightly in plastic wrap and then place them in a freezer-safe bag or container. They can be frozen for up to 3 months. When you’re ready to enjoy them, simply thaw at room temperature for a few hours.
What if my batter is too thick or too thin?
If your cupcake batter seems too thick, you can add a little more buttermilk, one tablespoon at a time, until it reaches a smooth pourable consistency. Conversely, if it’s too thin, adding a bit more flour (1 tablespoon at a time) can help thicken it up. Just be cautious not to overmix!
How many cupcakes does this recipe yield?
This delightful recipe makes about 12 vibrant green velvet cupcakes, perfect for sharing at gatherings or enjoying as a sweet treat throughout the week!
What’s the best way to frost these cupcakes?
For the creamiest finish, use softened cream cheese and butter when making the frosting. You can apply it using a spatula for a rustic look or pipe it with a decorative tip for that bakery-style finish! Aim for each cupcake to be topped generously so every bite is rich and delicious!

Leave a Comment