

Picture the tantalizing aroma of freshly baked cookies wafting through the air, their golden edges crisp and inviting, while the gooey chocolate chips melt into a warm, sweet embrace. Each bite promises a delightful crunch followed by a soft, chewy center that makes you feel like a kid again, eagerly waiting for dessert after dinner.
Thinking back to cozy family gatherings where laughter and love were sprinkled with sugar, these cookies never failed to steal the show. Perfect for holidays, late-night cravings, or just because you deserve a treat, this recipe guarantees to wrap you in a blanket of nostalgic joy and flavor that will leave you reaching for seconds—and maybe even thirds!
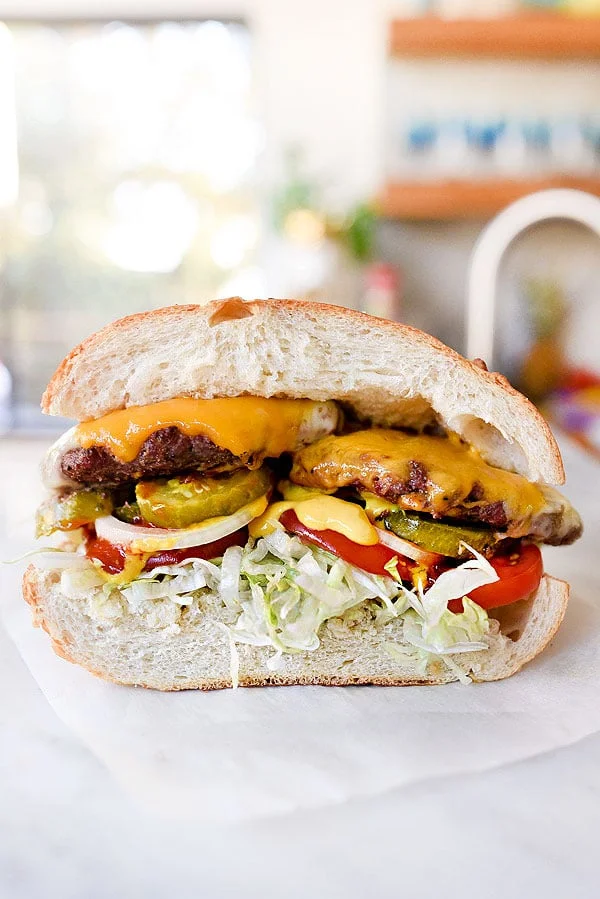
Why are Garlic Burgers a must-try?
Juicy flavor: Each bite bursts with rich, garlicky goodness that elevates the classic burger experience.
Quick prep: Whip these up in under 30 minutes—perfect for busy weeknights!
Versatile toppings: Customize with your favorite cheese and fresh veggies for endless combinations.
Crowd-pleaser: Impress family and friends at cookouts; everyone will be raving about them!
Easy cleanup: Fewer dishes mean more time enjoying your delicious creation.
Garlic Burgers Ingredients
For the Burger Patties
- Ground Beef – use a blend of 80/20 for juicy, flavorful patties.
- Garlic Cloves – fresh minced garlic adds that irresistible aroma and taste to your garlic burgers.
- Onion Powder – enhances the overall flavor without the crunch of fresh onions.
- Salt and Pepper – essential seasonings to balance the flavors in your burgers.
For the Toppings
- Lettuce Leaves – crisp lettuce provides a refreshing crunch that complements the savory burger.
- Tomato Slices – juicy tomatoes add brightness and moisture to each bite.
- Cheddar Cheese – melty cheese elevates your garlic burgers to cheesy perfection.
- Garlic Aioli – this creamy spread infuses even more garlic goodness into your meal.
For Serving
- Burger Buns – choose soft, toasted buns to hold everything together deliciously!
How to Make Garlic Burgers
1. Prep the Ingredients: Start by finely chopping fresh garlic and mixing it with ground beef in a large bowl. This step infuses your burgers with that delightful garlic flavor.
2. Shape the Patties: Form the mixture into equal-sized patties, about ¾ inch thick. Press a small dimple in the center of each patty to prevent them from puffing up while cooking.
3. Season Generously: Sprinkle salt and pepper on both sides of each patty for added flavor. Don’t be shy; this is crucial for mouthwatering garlic burgers!
4. Preheat the Grill: Heat your grill or skillet to medium-high heat, around 375°F. A hot surface helps achieve that perfect sear and locks in all those juicy flavors.
5. Cook to Perfection: Place the patties on the grill and cook for about 4-5 minutes per side, or until they reach an internal temperature of 160°F and have a nice char.
6. Add Cheese (Optional): If you love cheesy garlic burgers, add a slice of your favorite cheese during the last minute of cooking and cover to melt.
7. Toast the Buns: Lightly butter your burger buns and toast them on the grill for 1-2 minutes until they are golden brown and crispy.
8. Assemble Your Burger: Layer your garlic burger with fresh lettuce, sliced tomatoes, and any other toppings you desire. The combination of flavors will make every bite unforgettable!
Optional: Top with freshly chopped parsley for a burst of color and freshness.
Exact quantities are listed in the recipe card below.
Tips for the Best Garlic Burgers
- Use Fresh Garlic: Freshly minced garlic elevates flavor. Avoid pre-minced varieties, as they can taste harsh and diminish the burger’s warmth.
- Don’t Overmix: When combining ingredients, mix just until incorporated. Overmixing can lead to tough burgers instead of juicy, tender bites.
- Season Generously: Don’t shy away from seasoning with salt and pepper. Proper seasoning is key to enhancing the rich garlic flavor in your burgers.
- Rest the Patties: Allow your formed patties to rest for about 30 minutes before cooking. This helps them hold their shape and enhances juiciness when grilling.
- Check Internal Temperature: Use a meat thermometer to ensure your garlic burgers reach 160°F for safe consumption without compromising juiciness.
- Toast Your Buns: Lightly toast your burger buns on the grill or skillet. This adds a delightful crunch and keeps them from getting soggy from any toppings.
How to Store and Freeze Garlic Burgers

- Room Temperature: Garlic burgers are best enjoyed fresh, but if left out, consume within 2 hours to ensure safety and flavor.
- Fridge: Store leftover garlic burgers in an airtight container for up to 3 days. This keeps them moist and flavorful while preventing any unwanted odors from your fridge.
- Freezer: For longer storage, wrap garlic burgers tightly in plastic wrap and place them in a freezer-safe bag. They can last up to 3 months—perfect for future cravings!
- Reheating: To reheat frozen garlic burgers, thaw overnight in the fridge and warm them in a skillet or microwave until heated through. Enjoy that delightful garlic flavor once more!
Garlic Burgers Variations to Try
Elevate your garlic burgers by mixing in delightful twists that tantalize your taste buds and spark joy at the table!
- Dairy-Free: Substitute regular cheese with vegan cheese or avocado for a creamy touch without dairy. Your burger will still be rich and satisfying!
- Spicy Kick: Add chopped jalapeños or a dash of hot sauce for an exciting heat level. This twist brings vibrant flavor while keeping the garlic essence intact.
- Herb Infusion: Mix in finely chopped fresh herbs like parsley or basil for added freshness. The aromatic notes elevate every bite, making it feel like a summer garden feast.
- BBQ Flavor: Brush the patties with barbecue sauce before grilling for a smoky, sweet glaze. The garlic pairs beautifully with the charred sweetness, creating a mouthwatering experience.
- Nutty Crunch: Fold in finely chopped walnuts or pecans into the meat mixture for unexpected texture. These additions provide a delightful crunch that contrasts with the juicy burger.
- Mediterranean Twist: Incorporate feta cheese and olives into the mix for a Mediterranean flair. The salty tang complements the garlic perfectly and transports you to sunny shores.
- Mushroom Medley: Add sautéed mushrooms into your patty mix for an earthy flavor boost. This variation enhances juiciness and creates an irresistible umami profile.
- Stuffed Surprise: Create stuffed garlic burgers with melted cheese or spinach in the center. When you take a bite, you’ll be surprised by the gooey goodness waiting inside!
Make Ahead Options
Garlic burgers are a fantastic choice for meal prep, allowing you to savor that rich, garlicky flavor any night of the week. You can prepare the burger patties up to 24 hours in advance—simply mix 1 pound of ground beef with 4 minced garlic cloves, salt, and pepper, then shape into patties. Store them in an airtight container in the fridge until you’re ready to cook. Additionally, you can chop your favorite toppings like lettuce, tomatoes, and onions up to 3 days ahead; just keep them stored separately in the refrigerator to maintain their freshness. When it’s time to enjoy your garlic burgers, grill or pan-fry the patties for about 5-6 minutes per side for a perfectly juicy result! This make-ahead strategy not only saves time but also ensures your family can enjoy flavorful meals without the last-minute rush.
Garlic Burgers Recipe FAQs
What type of garlic is best for Garlic Burgers?
Fresh garlic is ideal for Garlic Burgers, as it offers a vibrant flavor that dried or powdered garlic can’t replicate. Look for firm, plump cloves with no soft spots. If you enjoy a milder taste, try roasting the garlic beforehand; it sweetens beautifully and adds a delightful depth to your burgers.
How should I store leftover Garlic Burgers?
To keep your Garlic Burgers fresh, store them in an airtight container in the refrigerator. They’ll last for up to 3 days. When you’re ready to enjoy them again, reheat in a skillet over medium heat for about 5 minutes or until warmed through, making sure not to dry them out.
Can I freeze Garlic Burgers?
Absolutely! To freeze Garlic Burgers, let them cool completely first. Wrap each burger tightly in plastic wrap or aluminum foil, then place them in a freezer-safe bag. They can be stored for up to 3 months. When you’re ready to eat, thaw them overnight in the refrigerator and reheat on the grill or stovetop until heated through.
What if my Garlic Burgers fall apart while cooking?
If your burgers are crumbling, it’s often due to not enough binding agents. Ensure you’re using a good ratio of breadcrumbs or egg to help hold everything together. If they still seem loose, try chilling them in the fridge for about 30 minutes before cooking; this firms them up nicely!
Are there any dietary considerations for Garlic Burgers?
Definitely! For gluten-free options, use gluten-free breadcrumbs and buns. If you’re looking for a low-carb alternative, consider wrapping your burger in lettuce instead of using a bun. Additionally, vegetarians can easily swap ground beef for lentils or mushrooms mixed with garlic for a hearty option!
Can I adjust the garlic level in my Garlic Burgers?
Of course! If you love garlic (like I do), feel free to increase the amount beyond what’s suggested in the recipe. Just remember that roasted garlic provides a mellower flavor than raw garlic. Start with one extra clove and taste-test as you mix—cooking should be all about finding your own perfect balance!
Garlic Burgers
Ingredients
Method
- Start by finely chopping fresh garlic and mixing it with ground beef in a large bowl.
- Form the mixture into equal-sized patties, about ¾ inch thick.
- Sprinkle salt and pepper on both sides of each patty.
- Heat your grill or skillet to medium-high heat, around 375°F.
- Place the patties on the grill and cook for about 4-5 minutes per side.
- If desired, add a slice of cheese during the last minute of cooking.
- Lightly butter your burger buns and toast them on the grill for 1-2 minutes.
- Layer your garlic burger with fresh lettuce, sliced tomatoes, and any other toppings.


Leave a Comment