


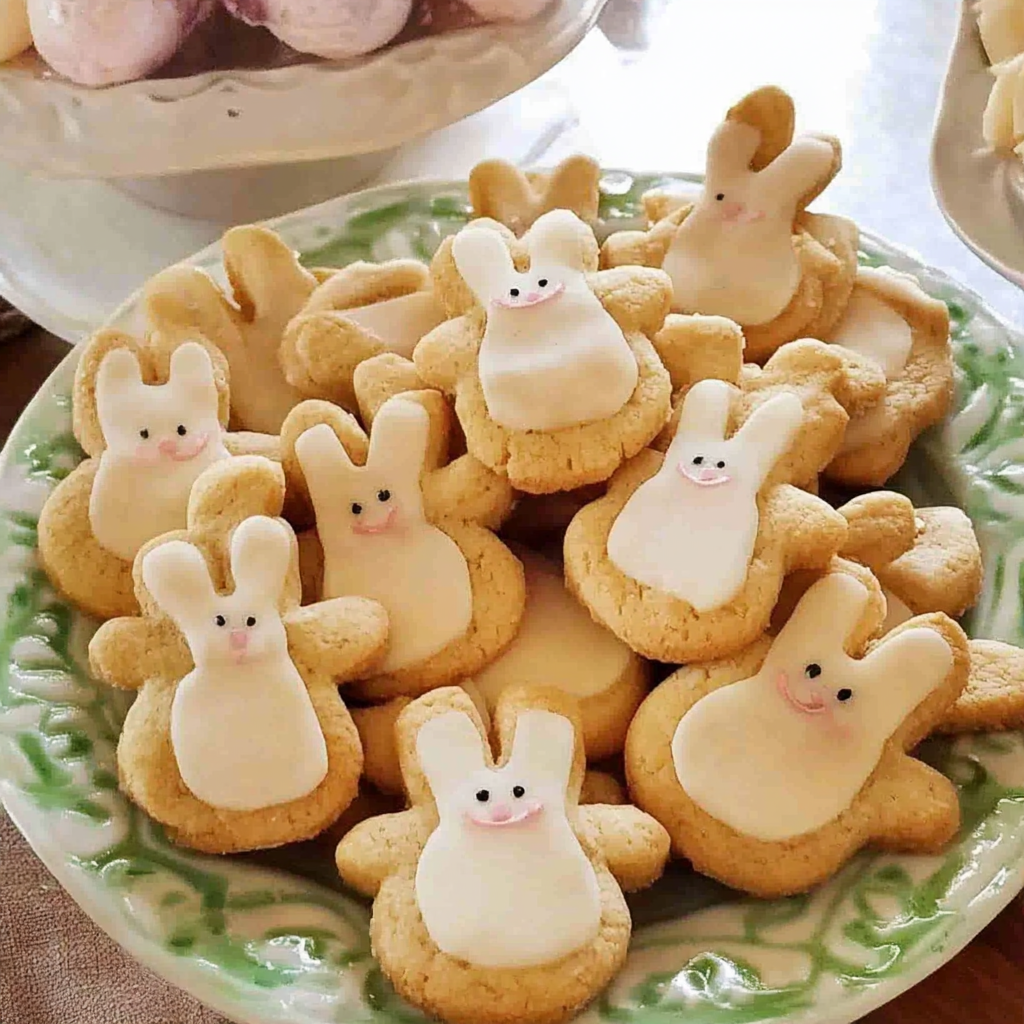
Bunny shaped cookies are more than just fun desserts; they bring joy and creativity to any baking session. These delightful treats are perfect for holidays like Easter or simply as a whimsical addition to family gatherings. With their cute shapes and customizable designs, you can engage kids and adults alike in the kitchen. The process of making bunny shaped cookies is straightforward and allows for plenty of creative expression through icing and decoration. In this recipe, we will guide you through each step needed to create these charming cookies from scratch. Not only will you enjoy the delicious flavor of these sweet delights, but you’ll also have an enjoyable time decorating them. So roll up your sleeves, preheat that oven, and let’s dive into the wonderful world of bunny shaped cookies!
Why You’ll Love This Bunny Shaped Cookies
- Quick and Easy: Minimal prep time and straightforward steps make this recipe stress-free, even for novice cooks
- Customizable Designs: You can decorate these cookies in countless ways, making them fun for everyone involved
- Great for All Ages: Kids love helping out with the decorating process, making this a perfect family activity

Looking for more delicious ideas? Try this next!
Ingredients for Bunny Shaped Cookies
Here’s what you’ll need to make this delicious dish:
- All-Purpose Flour: This is the main ingredient that provides structure; ensure it’s sifted for better results.
- Sugar: Granulated sugar adds sweetness; you can adjust the amount based on your preference.
- Unsalted Butter: Softened butter gives the cookies a rich flavor; make sure it’s at room temperature before use.
- Eggs: Use large eggs; they help bind the ingredients together while adding moisture.
- Baking Powder: This leavening agent helps the cookies rise; fresh baking powder ensures optimal fluffiness.
- Vanilla Extract: Pure vanilla extract enhances flavor; opt for high-quality extract if possible.
The full ingredients list, including measurements, is provided in the recipe card directly below.
How to Make Bunny Shaped Cookies
Follow these simple steps to prepare this delicious dish:
Step 1: Preheat Your Oven
Preheat your oven to 350°F (175°C). Line a baking sheet with parchment paper to prevent sticking.
Step 2: Mix Dry Ingredients
In a bowl, whisk together all-purpose flour and baking powder until combined. Set aside.
Step 3: Cream Butter and Sugar
In another bowl, cream softened butter and sugar together until light and fluffy. This should take about two minutes with an electric mixer.
Step 4: Add Eggs and Vanilla
Add eggs one at a time into the butter mixture along with vanilla extract. Mix until well combined.
Step 5: Combine Wet and Dry Ingredients
Gradually add the dry ingredients into the wet mixture. Mix until just combined; avoid overmixing.
Step 6: Shape Your Bunnies
Scoop out dough using a cookie cutter shaped like a bunny. Place them on the prepared baking sheet with some space between each cookie.
Transfer to plates or serving trays once cooled completely. Decorate as desired using icing or sprinkles!

You won’t want to miss this amazing recipe!
Tips and Tricks
Here are some helpful tips to ensure the best results for your dish:
- Chill the Dough: For easier handling, chill the dough in the refrigerator for about an hour before cutting shapes.
- Avoid Overbaking: Keep an eye on your cookies while they bake; they should be lightly golden around the edges.
- Use Food Coloring Wisely: When icing your cookies, incorporate gel food coloring for vibrant colors without altering consistency.
How to Serve Bunny Shaped Cookies
This Bunny Shaped Cookies is versatile and pairs wonderfully with:
- Milk: A classic pairing that enhances the sweetness of the cookies while providing a creamy contrast.
- Fruit Platter: Fresh fruits add a burst of color and natural sweetness, balancing the rich flavors of the cookies.
- Ice Cream: The cold creaminess complements the warm, soft texture of Bunny Shaped Cookies for a delightful treat.
Feel free to pair it with your favorite sides for a personalized meal!

If you love this, you’ll enjoy this recipe too!
Make Ahead and Storage
- Make Ahead: You can prepare Bunny Shaped Cookies dough in advance. Chill it in the refrigerator for up to 24 hours before rolling and cutting into shapes. This helps enhance flavors and makes handling easier.
- Storing: Store leftover cookies in an airtight container at room temperature for up to five days. If you prefer longer storage, you can freeze them for up to three months; just ensure they are well-wrapped to prevent freezer burn.
- Reheating: To reheat your Bunny Shaped Cookies, preheat your oven to 350°F (175°C) and place the cookies on a baking sheet for about five minutes. This method keeps them soft and enjoyable without losing their flavor.
Suggestions for Bunny Shaped Cookies
Avoid Overmixing the Dough
Overmixing your cookie dough can lead to tough cookies instead of soft and chewy ones. When combining your dry ingredients with wet ones, mix just until you see no flour streaks. The goal is to incorporate everything without developing too much gluten. Handle the dough gently and refrain from excessive kneading. This practice keeps the texture light and fluffy, which is essential for achieving the perfect bunny-shaped cookies. Remember that a gentle touch goes a long way in baking, so keep it simple!
Use Chilled Dough
Chilling your dough is a crucial step that many bakers overlook. After preparing your bunny-shaped cookie dough, wrap it in plastic wrap and refrigerate for at least 30 minutes. Chilling firms up the butter in your dough, helping the cookies maintain their shape during baking. If you skip this step, you might end up with misshapen bunnies that lose their features in the oven. A well-chilled dough results in beautifully shaped cookies that are both delicious and visually appealing.
Choose Quality Cookie Cutters
The quality of your cookie cutters can significantly impact the final product. Opt for sturdy metal or plastic cutters designed specifically for detailed shapes like bunnies. Cheap or flimsy cutters may not make clean cuts, leading to messy edges on your cookies. Invest in a good set of cookie cutters that feature sharp edges and provide clear shapes. The right tools make all the difference, ensuring that each bunny-shaped cookie looks as delightful as it tastes.
Don’t Skip the Frosting
Frosting adds flavor and visual appeal to your bunny-shaped cookies. While some bakers might consider them complete without decoration, a simple layer of icing or royal icing can elevate them dramatically. You can use different colors to create fun designs or add sprinkles for extra texture. Plus, frosting allows you to personalize each cookie, making them perfect for special occasions like Easter or spring celebrations. Don’t underestimate the power of frosting; it’s an integral part of creating enticing bunny-shaped cookies.
Another must-try dish for your recipe collection!
FAQs
How can I make my Bunny Shaped Cookies soft?
To achieve soft bunny-shaped cookies, focus on using room temperature ingredients and avoid overbaking them. Ensure that you measure flour correctly by spooning it into a measuring cup rather than scooping directly from the bag, which can lead to excess flour. Also, consider using brown sugar instead of white sugar since brown sugar helps retain moisture in baked goods. Finally, bake your cookies just until they are lightly golden around the edges but still soft in the center—a crucial step for keeping them tender.
Can I freeze Bunny Shaped Cookies?
Yes! Freezing bunny-shaped cookies is a great way to preserve their freshness for later enjoyment. Allow your baked cookies to cool completely before freezing them on a baking sheet lined with parchment paper for an hour or two until they’re firm. Once frozen, transfer them to an airtight container or freezer bag and store them in the freezer for up to three months. When you’re ready to eat them, simply thaw at room temperature or warm them slightly in the oven.
What flavors work best with Bunny Shaped Cookies?
Bunny-shaped cookies pair wonderfully with various flavors! Classic vanilla is always a crowd-pleaser, but you can also experiment with almond extract for a nutty twist or lemon zest for a refreshing citrusy note. Chocolate-flavored dough can be delightful as well; just remember to balance it with complementary frostings like cream cheese or vanilla icing. Feel free to mix flavors based on seasonal themes or personal preferences—it’s all about making these treats uniquely yours!
How do I decorate Bunny Shaped Cookies?
Decorating bunny-shaped cookies offers endless creative possibilities! Start with a base layer of simple royal icing once they’ve cooled completely. You can then use food coloring to dye additional icing for different designs—think pastel shades for springtime themes! Consider adding cute details like edible eyes using small candies or chocolate chips and using colored sprinkles for texture. Get inspired by nature or festive occasions; each decorated cookie will reflect your artistic flair!
Conclusion for Bunny Shaped Cookies
In summary, perfecting bunny-shaped cookies involves several key techniques that ensure delightful results every time you bake. Remember to avoid overmixing your dough and chilling it adequately before cutting shapes; these steps promote ideal texture and form. Investing in quality cookie cutters makes shaping easier while adding frosting elevates both taste and appearance significantly. Lastly, feel free to explore various flavors and decorations while enjoying this fun baking adventure! With these tips in mind, you’re set to impress family and friends with adorable and delicious bunny-shaped cookies!

Bunny Shaped Cookies
- Total Time: 25 minutes
- Yield: Approximately 24 cookies 1x
Description
Bunny shaped cookies are a delightful treat that adds a whimsical touch to any celebration, particularly during holidays like Easter. With their cute shapes and endless decorating possibilities, these soft and sweet cookies provide a fun baking experience for families. This simple recipe is perfect for involving kids in the kitchen, ensuring a memorable activity that results in delicious, adorable cookies that will impress guests and bring smiles all around.
Ingredients
- 2 ¾ cups all-purpose flour
- 1 cup granulated sugar
- ½ cup unsalted butter (softened)
- 2 large eggs
- 1 tsp baking powder
- 2 tsp vanilla extract
Instructions
- Preheat your oven to 350°F (175°C) and line a baking sheet with parchment paper.
- In a bowl, whisk together the flour and baking powder; set aside.
- In another bowl, cream softened butter and sugar until light and fluffy.
- Add eggs one at a time, mixing in vanilla extract until well combined.
- Gradually incorporate the dry ingredients into the wet mixture until just combined.
- Use a bunny-shaped cookie cutter to cut out cookies and place them on the prepared baking sheet.
- Bake for 8-10 minutes or until lightly golden around the edges. Cool completely before decorating as desired.
Notes
Chill the dough for about 30 minutes before cutting shapes for easier handling.
Experiment with different flavors by adding citrus zest or almond extract to the dough.
Use gel food coloring for vibrant icing without altering its consistency.
- Prep Time: 15 minutes
- Cook Time: 10 minutes
- Category: Dessert
- Method: Baking
- Cuisine: American
Nutrition
- Serving Size: 1 cookie (30g)
- Calories: 150
- Sugar: 8g
- Sodium: 50mg
- Fat: 6g
- Saturated Fat: 4g
- Unsaturated Fat: 2g
- Trans Fat: 0g
- Carbohydrates: 23g
- Fiber: <1g
- Protein: 2g
- Cholesterol: 15mg

Leave a Comment