

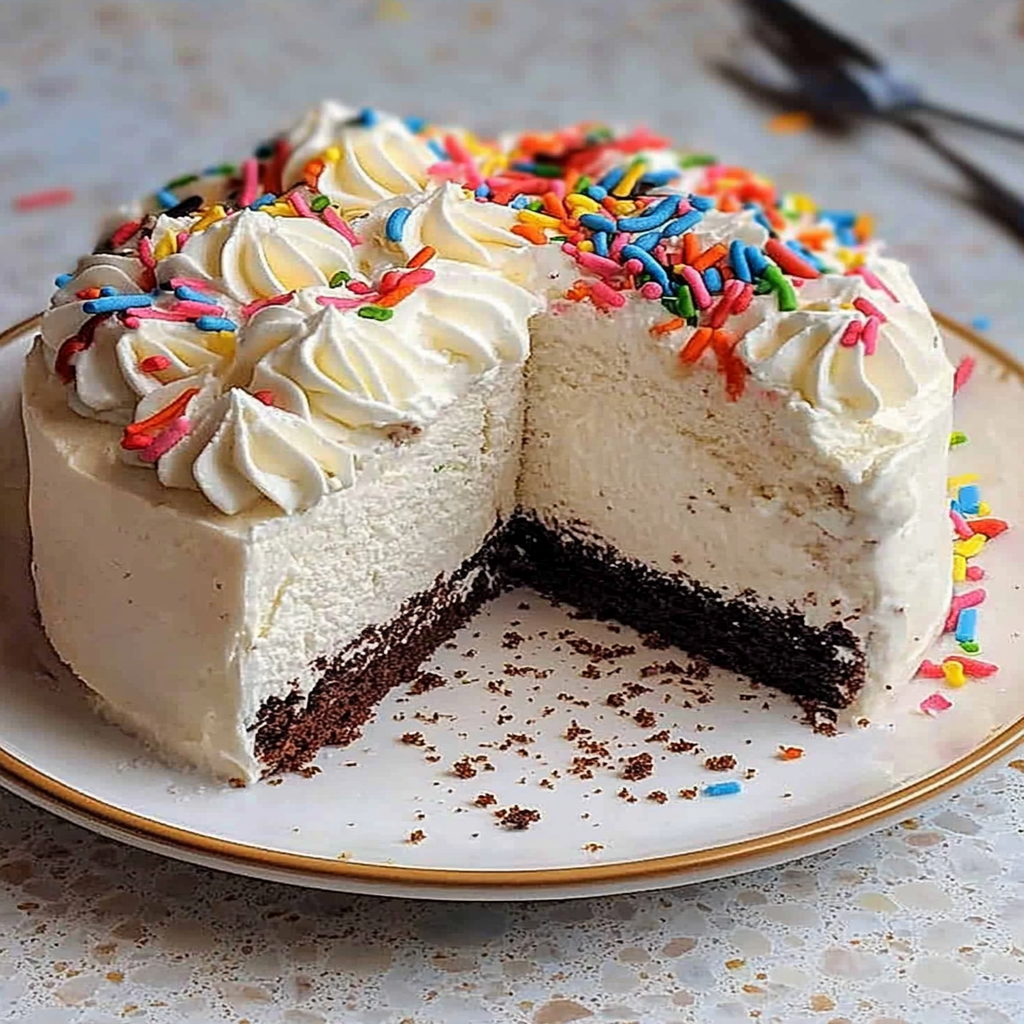
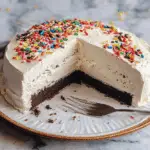
There’s something magical about a Dairy Queen ice cream cake. Picture this: layers of creamy, dreamy ice cream sandwiched between rich chocolate and vanilla cake, all topped with luscious frosting that could make even the coldest hearts melt. no churn ice cream recipe Each slice is like a party in your mouth, complete with sprinkles of joy and a cherry on top. It’s the kind of dessert that brings back memories of birthday celebrations and summer barbecues, making every occasion feel like a festive event.
If you’ve ever stood in front of the freezer section, eyes glazed over while contemplating which frozen treat to indulge in, let me tell you—this homemade Dairy Queen ice cream cake is the answer to your dessert prayers. This delightful concoction is not just for birthdays; it’s perfect for any gathering or just for when you need to treat yourself after a long day. dulce de leche fondue Trust me, once you whip this up, your taste buds will be throwing a confetti-filled rave.
Why You'll Love This Recipe
- This Dairy Queen ice cream cake is incredibly easy to prepare at home using simple ingredients.
- The flavor combination of chocolate and vanilla ice cream creates a delightful harmony that everyone loves.
- Its visual appeal makes it a stunning centerpiece for any celebration or casual get-together.
- Plus, it’s versatile enough to customize with your favorite flavors and toppings!
Ingredients for dairy queen ice cream cake
Here’s what you’ll need to make this delicious dish:
- Chocolate Cake Mix: A box mix makes life easier; just add eggs, water, and oil as directed.
- Vanilla Ice Cream: Choose high-quality vanilla ice cream for that classic flavor that pairs perfectly with chocolate.
- Chocolate Ice Cream: You can’t have too much chocolate! A rich chocolate ice cream adds depth to each layer.
- Whipped Topping: Use store-bought or homemade whipped topping to give your cake that fluffy finish.
- Chocolate Syrup: Drizzle this on top for an extra touch of sweetness and visual appeal.
The full ingredients list, including measurements, is provided in the recipe card directly below.
How to Make dairy queen ice cream cake
Follow these simple steps to prepare this delicious dish:
Step 1: Bake the Cake
Preheat your oven according to the directions on the cake mix box—usually around 350°F (175°C). Grease two round cake pans and prepare the batter as instructed. Pour it evenly into both pans and bake until a toothpick comes out clean. Let them cool completely.
Step 2: Layer the Ice Cream
Once the cakes are cooled and ready to go, take one layer and place it on a serving plate. Allow the vanilla ice cream to soften slightly before spreading it evenly over the first layer. Next, gently place the second cake layer on top.
Step 3: Add Chocolate Ice Cream
Repeat the process by spreading a generous layer of chocolate ice cream on top of the second cake layer. Ensure it’s smooth and even so every bite is deliciously uniform.
Step 4: Frosting Time
Grab your whipped topping and cover the entire cake with it—don’t worry about perfection; rustic is in! Make sure each inch of cake is covered so every slice has a creamy topping.
Step 5: Drizzle Away
Now comes the fun part! Grab that chocolate syrup and drizzle it over the top like you’re an artist creating a masterpiece. You can also sprinkle some chocolate shavings or colorful sprinkles if you’re feeling extra festive.
Step 6: Freeze
Pop your creation into the freezer for at least two hours before serving. This step ensures everything stays together when you slice into it—plus, who doesn’t love cold treats?
Transfer to plates and serve this delightful Dairy Queen ice cream cake with a side of joyful memories! Your guests will definitely be asking for seconds (and thirds)!
You Must Know
- This delightful dairy queen ice cream cake is not only a crowd-pleaser but also a fun project for anyone craving a sweet treat.
- With layers of creamy goodness and crunchy bits, it’s perfect for celebrations or just an indulgent dessert night at home.
Perfecting the Cooking Process
Start by preparing your cake layers first; they need time to cool down. While they are cooling, whip up your favorite frosting and layer the ice cream. Assemble everything once it’s chilled, and voilà!
Add Your Touch
Feel free to swap the chocolate cake for vanilla or even a red velvet version. Add fruit like strawberries or blueberries between the layers for a fresh twist, or drizzle with caramel sauce for extra decadence.
Storing & Reheating
Store any leftovers in an airtight container in the freezer to keep them fresh. If you need to reheat, let it sit out for a few minutes before slicing; no one wants a frozen slice of happiness!
Chef's Helpful Tips
- Use room temperature ingredients to ensure even mixing and avoid lumps in your batter.
- Don’t skimp on chilling time; it helps the layers set beautifully.
- Finally, try using a serrated knife when cutting; it keeps those perfect layers intact!
Sometimes I find myself reminiscing about the first time I made this dairy queen ice cream cake. My friends devoured it in minutes; their smiles were worth every ounce of effort!
FAQs:
What is a Dairy Queen Ice Cream Cake made of?
A Dairy Queen Ice Cream Cake typically consists of a layer of vanilla and chocolate ice cream, combined with a chocolate crunch center. The cake is finished with whipped icing and often features decorative elements like chocolate shavings or cookie pieces. This delightful dessert is perfect for celebrations and special occasions, offering a sweet treat that combines the richness of cake with the creaminess of ice cream. For more inspiration, check out this Magic Pecan Cheesecake Bars recipe.
How do you store Dairy Queen Ice Cream Cake?
To store a Dairy Queen Ice Cream Cake, keep it in the freezer to maintain its texture and flavor. Wrap the cake tightly in plastic wrap or aluminum foil to prevent freezer burn. It’s best to consume the cake within one to two weeks for optimal freshness. If you’re serving leftovers, slice pieces and wrap them individually for easy access while keeping the rest frozen.
Can you customize a Dairy Queen Ice Cream Cake?
Yes, you can customize a Dairy Queen Ice Cream Cake! Dairy Queen offers various flavors and designs to choose from. You can select your favorite ice cream flavors, mix-ins, and even personalize the cake with messages or decorations for special occasions. This makes it a versatile dessert option suitable for birthdays, anniversaries, and other celebrations.
How long can you leave a Dairy Queen Ice Cream Cake out?
A Dairy Queen Ice Cream Cake should not be left out at room temperature for more than 30 minutes. After this time, the ice cream may begin to melt, affecting its texture and taste. If the cake needs to be displayed at an event, consider keeping it on ice or returning it to the freezer periodically to maintain its delicious consistency.
Conclusion for dairy queen ice cream cake:
In summary, the Dairy Queen Ice Cream Cake is a delightful dessert that combines creamy ice cream layers with a crunchy center, making it ideal for various celebrations. Its customizable options allow you to tailor it to any occasion. Proper storage ensures that your cake stays fresh and enjoyable. Whether you’re celebrating a birthday or just treating yourself, this cake remains a beloved choice among dessert lovers. Enjoy every bite!
Dairy Queen Ice Cream Cake
- Total Time: 1 hour
- Yield: Serves 10 1x
Description
Dairy Queen Ice Cream Cake is a nostalgic dessert that transforms any gathering into a celebration. With layers of rich chocolate cake and creamy vanilla and chocolate ice cream, this homemade delight is topped with fluffy whipped icing and drizzled with chocolate syrup. Perfect for birthdays, summer barbecues, or simply indulging yourself, this cake promises to impress your guests and satisfy your sweet tooth.
Ingredients
- 1 box chocolate cake mix (15.25 oz)
- 2 large eggs
- 1 cup water
- 1/3 cup vegetable oil
- 2 cups vanilla ice cream (softened)
- 2 cups chocolate ice cream (softened)
- 2 cups whipped topping (store-bought or homemade)
- 1/4 cup chocolate syrup
Instructions
- Preheat your oven to 350°F (175°C). Grease two round cake pans.
- Prepare the chocolate cake mix according to package instructions using eggs, water, and oil. Divide the batter between the two pans and bake until a toothpick comes out clean (about 25-30 minutes). Allow to cool completely.
- Once cooled, place one cake layer on a serving plate and spread softened vanilla ice cream over it. Add the second cake layer on top.
- Spread softened chocolate ice cream over the second layer evenly.
- Cover the entire cake with whipped topping, ensuring even coverage.
- Drizzle chocolate syrup on top for decoration. Optionally, add sprinkles or chocolate shavings.
- Freeze for at least 2 hours before serving. Slice and enjoy!
- Prep Time: 30 minutes
- Cook Time: 30 minutes
- Category: Dessert
- Method: Baking
- Cuisine: American
Nutrition
- Serving Size: 1 serving
- Calories: 320
- Sugar: 28g
- Sodium: 220mg
- Fat: 16g
- Saturated Fat: 8g
- Unsaturated Fat: 7g
- Trans Fat: 0g
- Carbohydrates: 38g
- Fiber: 1g
- Protein: 5g
- Cholesterol: 50mg


Leave a Comment